

Virtual Cat
Today you are going to program your very own Tamagotchi look-alike cat, or what I call a Virtual Cat (for those of you who are very young and have no idea what a Tamagotchi is :D). Like an actual cat, the Virtual Cat requires you to care for it by feeding, cleaning and walking it. It is an awesome toy for young children to play with, to give them a feel of caring for a pet before handling an actual pet.
You will need:
Block Editor Link
Hex File Download
1x micro:bit
1x Battery holder
2x AAA batteries
1x USB connector
2x large pieces of cardboard
1x Hot glue gun/PVA glue
1x Scissors
1x Pen-knife
2x Pipe Cleaners
1x Earpiece
1x LED light bulb
4x Crocodile clip
Some Paint - acrylic or poster paint would do.
1x Pencil
1x Ruler
1x Marker
1 roll of Duct tape
Instructions
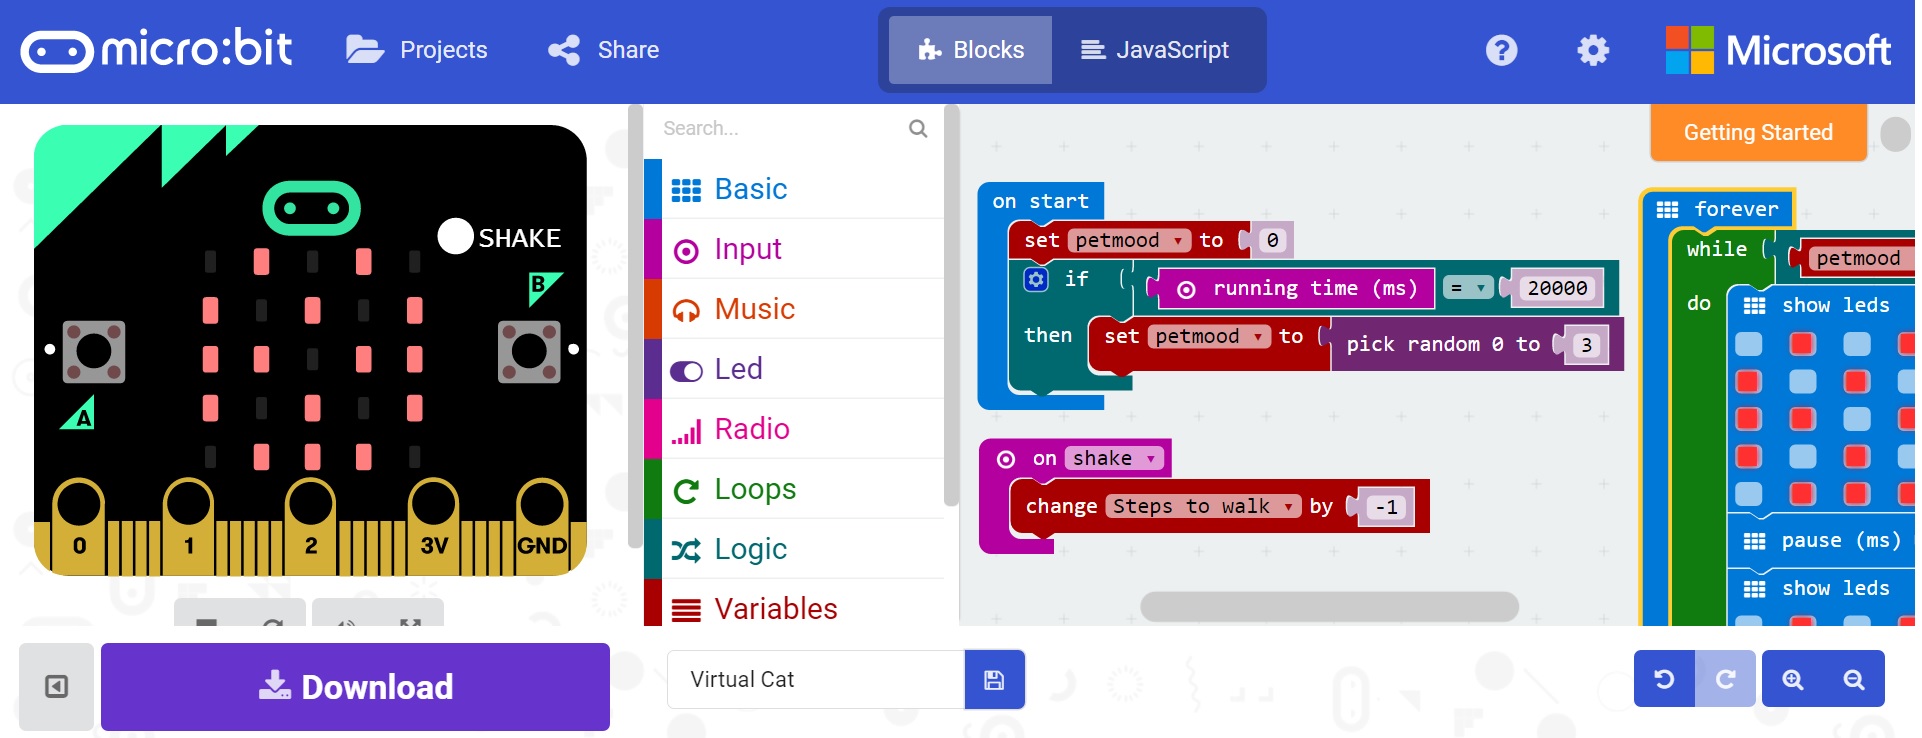
1. 1 Upload the HEX file onto the Javascript Block Editor
I have attached the code to the Virtual Cat program here (download the microbit-Virtual-Cat.hex file)
For those of you who do not wish to learn how the code is written, you may just download the HEX file from the “Hex File Download” button above and transfer it onto your micro:bit, and skip to Step 4.
For those of you that are interested in the code, upload the HEX file onto the PXT editor by clicking on the “Hex File Download” button above and point the code editor to open the HEX file. Move on to Step 2.
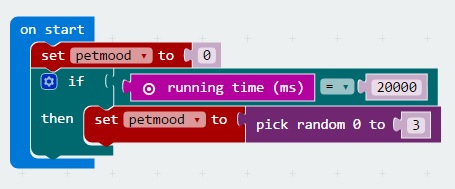
2. What Does the Program Say? - Part I
The Virtual cat is programmed to have 4 different states, where
-
State 1: Neutral state, cat blinks and does nothing else.
-
State 2: Hungry state, cat face appears once and scrolls the text “FEED ME”.
-
State 3: Poop state, poop animation shows on screen and scrolls the text “FLUSH ME”.
-
State 4: Play state, cat’s body appears and scrolls the text “WALK ME”. After which the number of steps to walk the cat (from 1 to 25) appears on the screen.
-
State 5: Happy state, cat face and heart shape animation appears.

3. What Does the Program Say? - Part II
The program goes into State 1 when the micro:bit turns on. After 20 seconds, the program will randomly go into a state from 2 to 4. If State 2 appears, the user need to hold down the “A” button in order to feed the cat. Once the cat is fed, it would go into State 5, and then reset itself back into State 1. If State 3 appears, the user need to hold down the “B” button in order to flush the poop, the cat similarly would go into State 5, followed by State 1. If State 4 appears, the user needs to shake the micro:bit. For each time the micro:bit is shaken, the number of steps required reduces by 1. Once the number of steps drops to zero, the program would go into State 5, followed by State 1 again.
The cycle continues once the Virtual Cat is back to State 1.
You may choose to edit the amount of time taken for the program to go in between the states, as well as add new states for our virtual cat. The possibilities are endless!
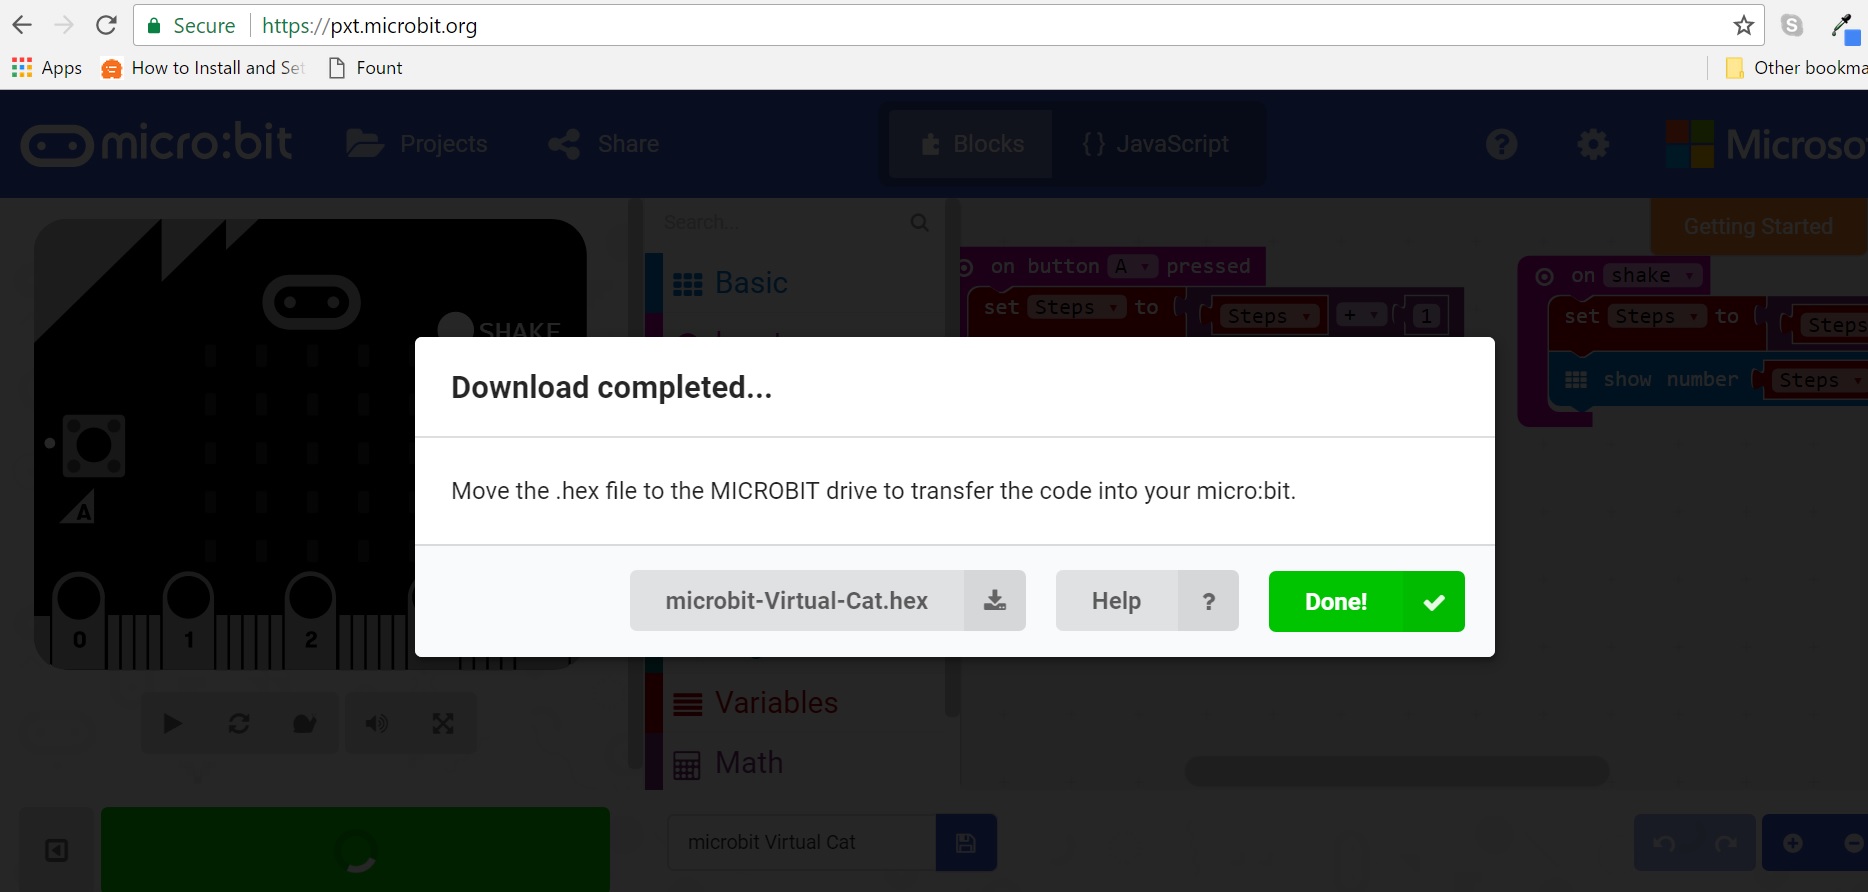
4. Upload Successful
Click done once you see the screen on the right, it means the script has been successfully downloaded to your default Downloads folder.
Copy the downloaded script to your micro:bit drive. The downloaded script should end with a .hex extension.
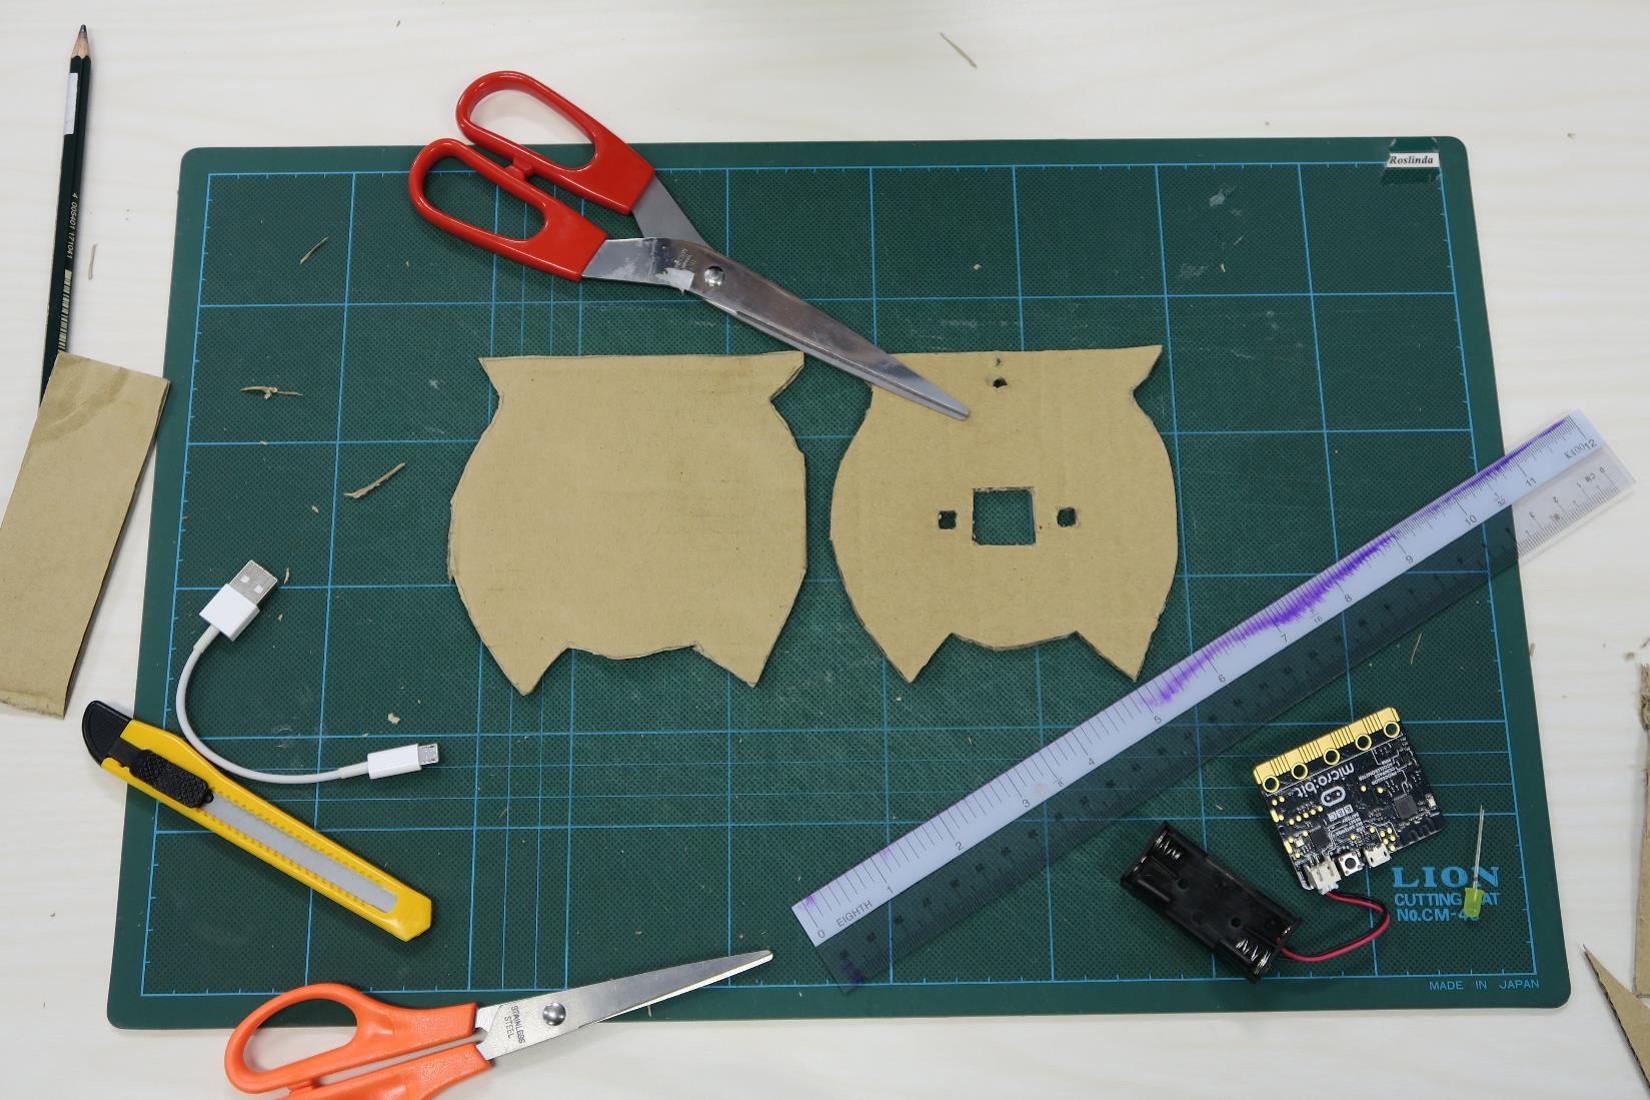
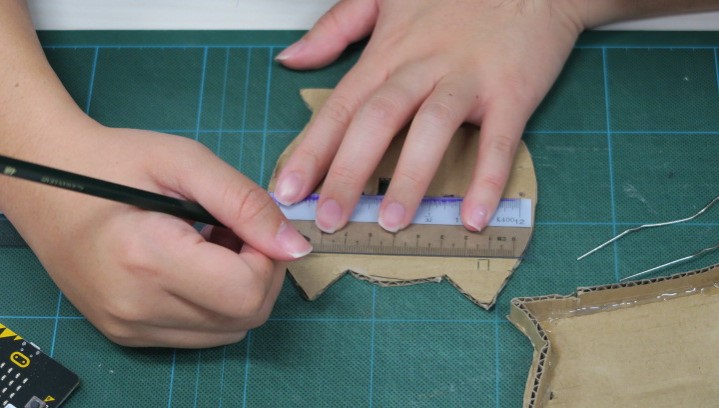
5. Creating the Front Cat Cover - Part I
Now we are going to create the casing of the Virtual Cat.
Draw an outline of the cat’s head and cut out two exact pieces (one for front and one for back). For measurements, you can make an exact measurement of the micro:bit and draw out its outline, the LED matrix and buttons. For the cat casing, you can decide how big you want it to be, just make sure that it is big enough to contain all the wires, LED, speakers etc. For your reference, mine was 11.5cm by 11cm.
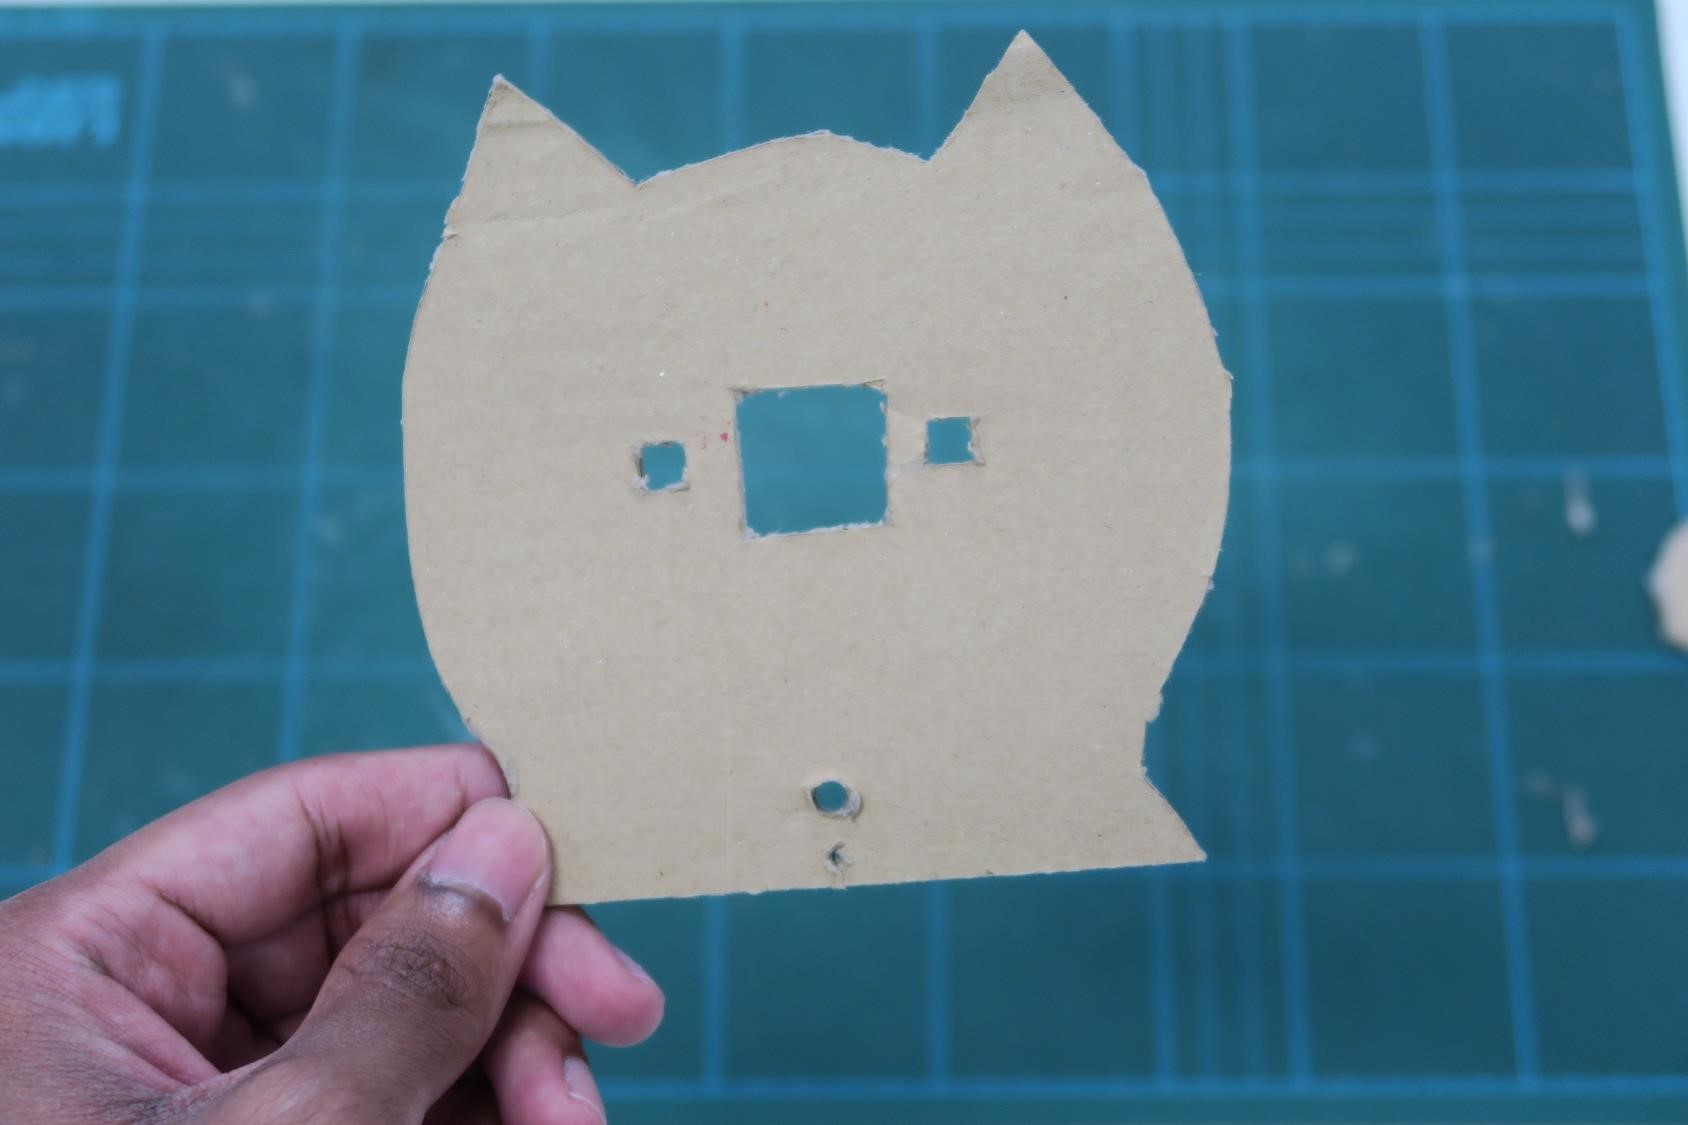
6. Creating the Front Cat Cover - Part II
Front cover:
-
Cut two holes for the earpiece to go through (at the ear of the cat)
-
Cut out the slots for the micro:bit’s LED display, A and B buttons
7. Creating the Front Cat Cover - Part III
-
Cut out a slot for the LED lightbulb to go through
-
Poke four small holes at the side of the cat’s face where the whiskers will be placed

8. Creating the Back Cat Cover - Part I
Use the other piece of cat-shaped cardboard and attach a thin piece of cardboard (Height >1.5cm) at its outline. Basically this would be the back cover of our project to contain all our parts.
I used a hot glue gun to affix the cardboard together, you may achieve the same using PVA or similar types of glue.
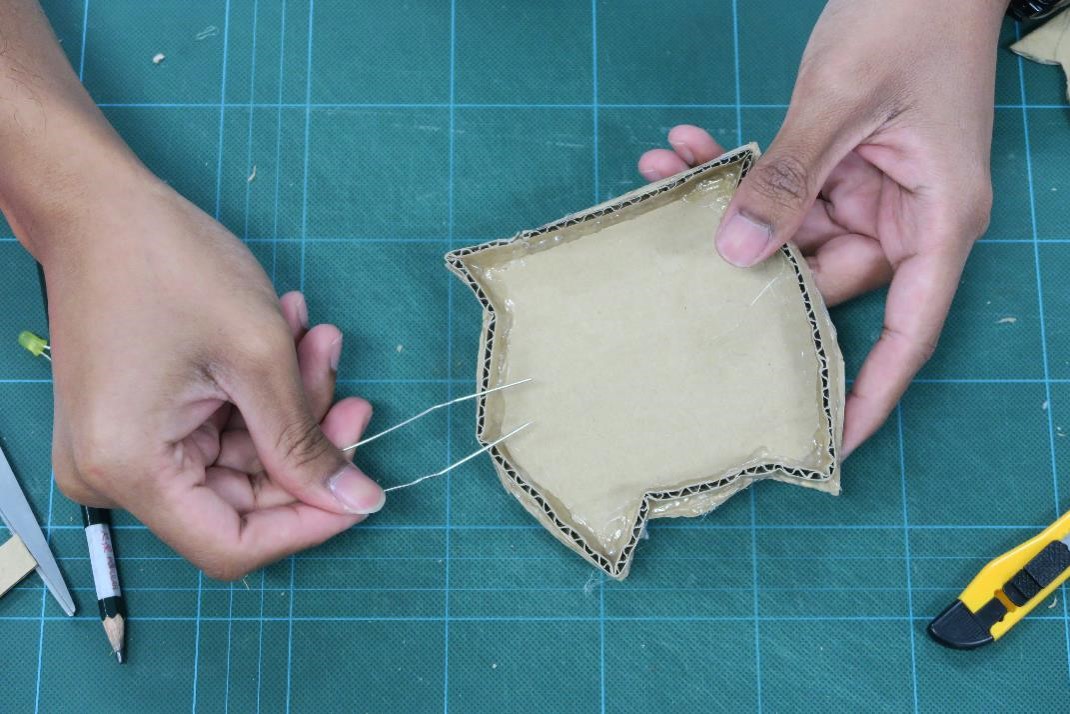
9. Creating the Back Cat Cover - Part II
Wait for the glue to dry.
After which, using a sharp object:
Poke two small holes at the side of the cupboard where so that the holes are aligned to the front cover.
Poke one hole in the middle of the cupboard so that the wire for the battery can go through .
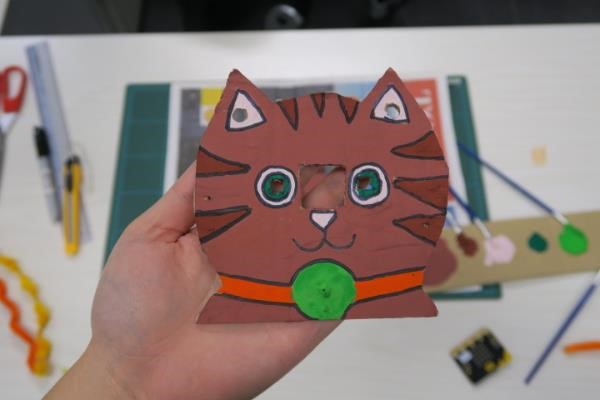
10. Drawing and Painting the Front and Back Cat Covers
Draw a cat’s face on the front cover and the back of the cat’s head on the back cover. The cat’s look is up to your own choosing, so get creative!
After which, paint both side of the covers. I used acrylic paint, but you can use any kinds of paints of your choosing.
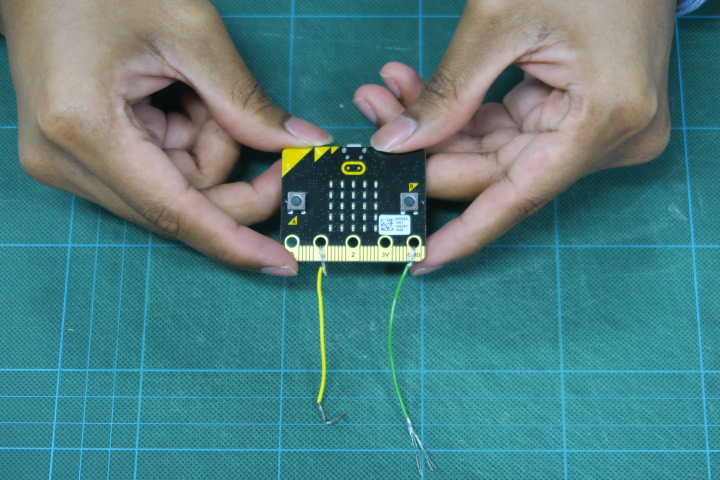
11. Attaching the LED - Part I
Attach 2 wires to the micro:bit, one at Pin 1 and at the GND pin. I twisted the copper wires around the pins to attach them, but you may solder them if you wish.
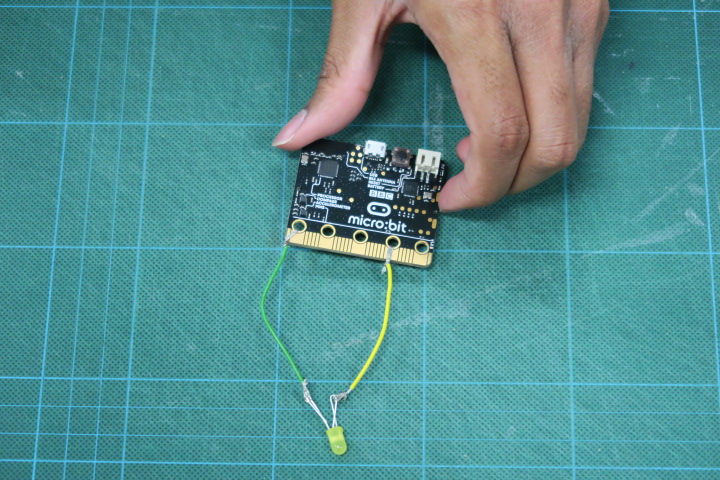
12. Attaching the LED - Part II
Next, bend the pins of the LED light and attach the wire to it. I twisted the wires but similarly, you could also solder for a more firm connection.
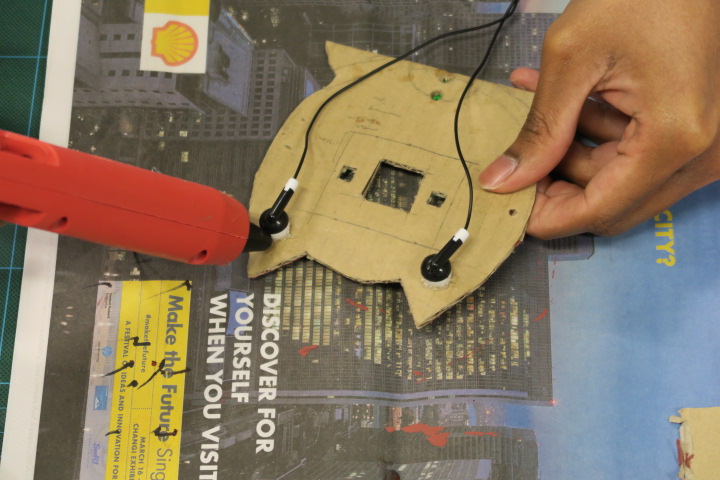
13. Attaching the Sound Output
We also want the cat to make a sound to notify us if it needs us. I used a cheap pair of earphones for the sound output. Place the tip of both earphones into the holes made in the ears at the front cover.
I hot-glued the earphones to the cover, you may use other kinds of glue. Do be careful not to apply the glue into the earphones!
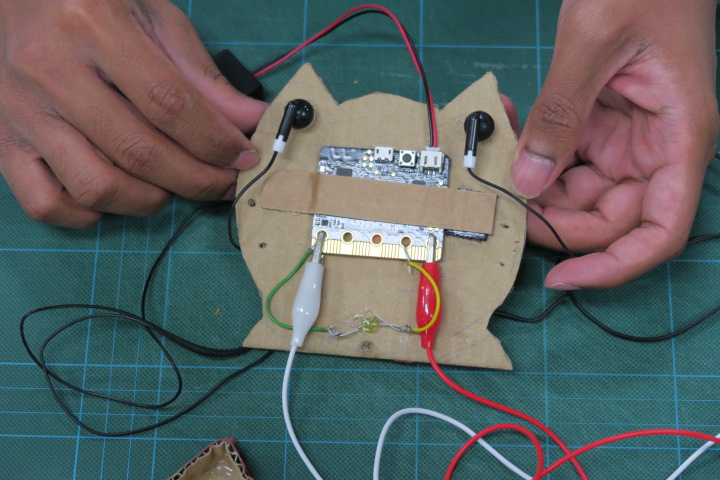
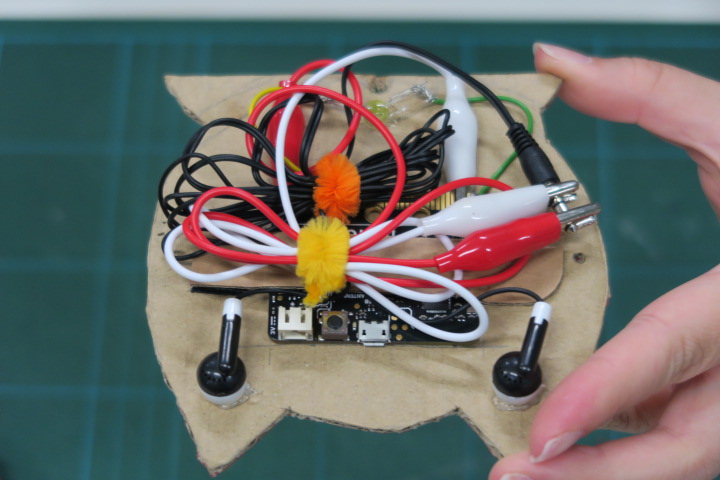
14. Attaching the micro:bit, Earphones and LED to the Front Cover: Part I
I made a makeshift strap from cardboard and hot glue it to fit the micro:bit snugly on the cover. Place the LED light through the bottom hole in the front cover.
Next use crocodile clips to connect Pin 0 to the the top part of the 3.5mm jack of the earphones and the GND pin to the bottom part of the 3.5mm jack.
15. Attaching the micro:bit, Earphones and LED to the Front Cover: Part II
The wires can become quite clunky, I tied the wires up to practice some proper wire management.
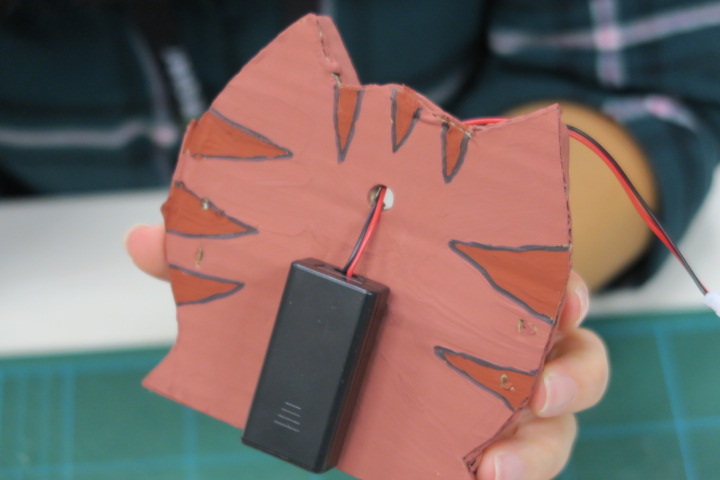
16. Attaching the battery holder
Attach the battery holder to the back of the Virtual Cat with velcro.
Put the wire of the battery holder through the back cover and connect it to the micro:bit.
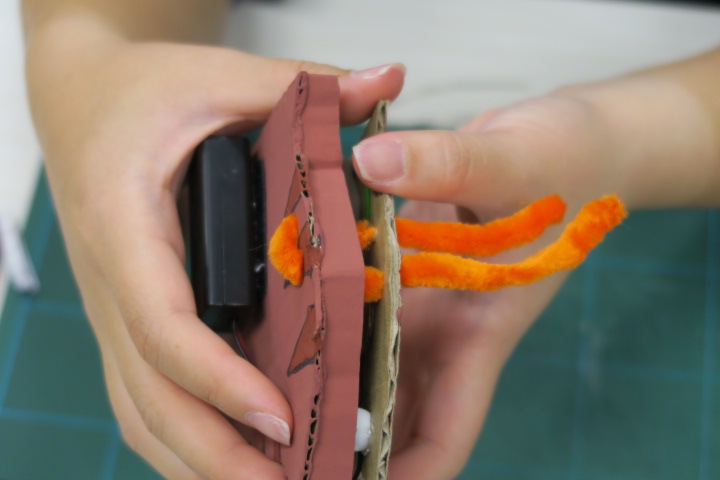
17. Joining the front and back of the Virtual Cat
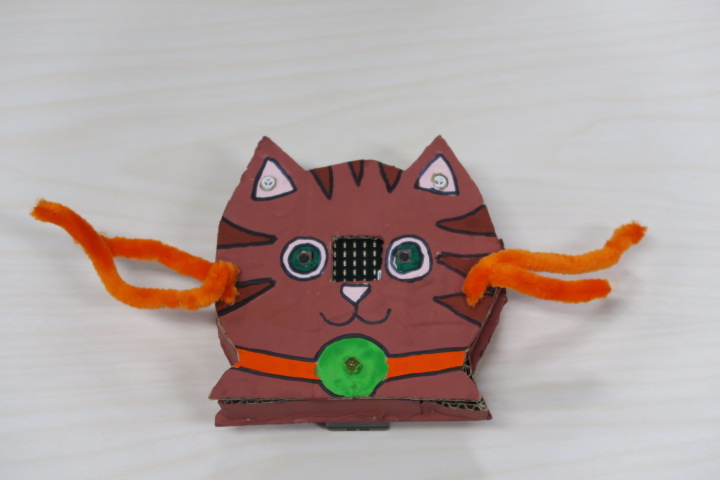
Join the two covers together using the pipe cleaners through the 4 holes. I choose orange to fit the color of the cat. Do ensure that all the wires and internal parts fit inside.
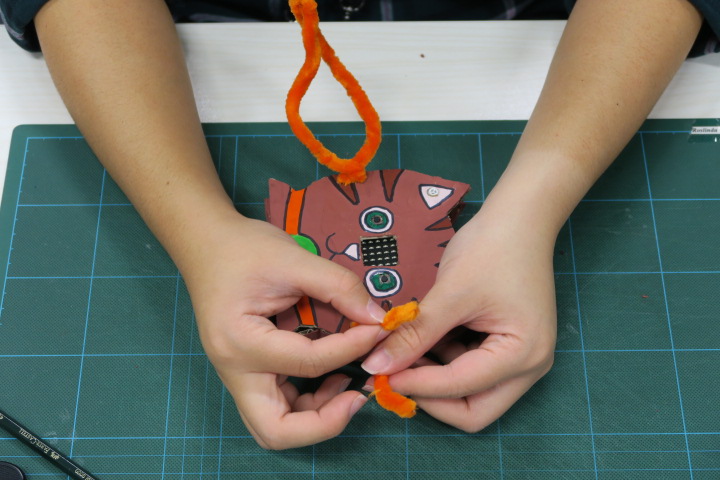
18. Finishing Touch
Twist the pipe cleaners to fasten the casing and the Virtual Cat is now completed!
19. End Product: Mission Complete!
Your Virtual Cat is now complete! MEOW!
Click here to go back to the Digital Maker Projects By Community main page.